When people picture residential solar energy, they almost always imagine blue or black rectangular panels bolted directly onto an asphalt shingle roof. But for homeowners with yard space, rural homesteaders, off-grid cabins, and small farms, ground mount solar is frequently the smarter, more powerful, and far more durable alternative.
A ground-mounted solar system consists of photovoltaic panels secured to freestanding metal racks or ballasted trays anchored directly into the earth rather than on a building.
Because ground arrays are completely decoupled from your home’s architecture, you are never constrained by the direction your roof slopes, the pitch of your rafters, tree shading along the eaves, or the terrifying prospect of having to uninstall your entire solar array a decade from now when your roof shingles need replacement.
In this beginner’s guide, we demystify how ground mount solar systems work, compare their costs and energy yields against standard roof mounts, explore the four main foundation types, explain underground trenching requirements, and review the best turnkey hardware kits for DIY builders.
Choose ground mount solar if your roof faces east/west, suffers from chimney or tree shading, requires re-roofing within 10 years, or if you want to deploy bifacial solar panels for a 15% to 25% winter albedo boost. While ground mounts require excavation and underground conduit trenching (typically adding $1,500 to $3,500 in upfront costs), their superior airflow and optimal tilt alignment generate noticeably more lifetime kilowatt-hours.
Understanding Ground Mount Solar Systems
At its core, a ground mount photovoltaic installation functions almost identically to a rooftop system on an electrical level: solar cells convert sunlight into direct current (DC) electricity, which flows through a properly sized solar array into an MPPT charge controller or hybrid inverter.
However, the physical mounting architecture is fundamentally different:
[  Solar Array at Optimal 35° Tilt  ]
        |                    |
   [ Aluminum Rafters & Cross-Rails ]
        \                    /
      [ Structural Steel Pipe Frame ]
        |                    |
============================================= Ground Level
        |                    |
 [ Concrete Piers / Driven Helical Screws / Ballasted Trays ]
        |
 [ Underground Trench with PVC Conduit (NEC 300.5) ] --------> [ Inverter Shed / Home ]
Instead of relying on lag bolts driven into wooden roof rafters, a ground mount is supported by heavy-duty galvanized steel or anodized aluminum framework anchored by concrete footings, helical earth screws, or heavy surface ballast trays.
The electricity generated by the array is routed through an underground trench back to your home, battery shed, or power station using direct-burial cable or heavy-gauge conductors encased in Schedule 40 or Schedule 80 PVC conduit.
Roof Mount vs. Ground Mount: The Definitive Comparison
Before investing thousands of dollars into racking hardware or roofing brackets, consider the fundamental trade-offs between rooftop and ground installations:
| Design Attribute | Rooftop Solar Mount | Ground-Mounted Array | Winner / Advantage |
|---|---|---|---|
| Azimuth & Orientation | Locked to home roof ridge direction | 100% customizable to True South | Ground Mount (+15% Yield) |
| Tilt Angle Optimization | Fixed to roof slope (often 18°–25°) | Adjustable from 15° to 60° | Ground Mount (Better Winter) |
| Thermal Ventilation | Trapped hot air underneath (+0.4%/°C drop) | Open ambient cross-ventilation | Ground Mount (+5% Efficiency) |
| Bifacial Generation | Dark shingles block rear-side albedo | Captures reflected light from grass/snow | Ground Mount (+15%–25% Gain) |
| Installation Safety | Fall hazards, roof penetrations, leaks | Work safely on solid ground | Ground Mount |
| Snow & Cleaning Access | Requires ladder, hazardous snow clearing | Walk right up with a soft foam brush | Ground Mount |
| Upfront Capital Cost | Lower (utilizes existing roof structure) | Higher (footings, racking, trenching) | Roof Mount ($1k–$3k Cheaper) |
| Space Requirement | Zero yard footprint | Consumes yard or pasture space | Roof Mount |
The Four Main Foundation Types for Ground Arrays
Depending on your soil composition, local frost line depth, and equipment access, ground mount systems rely on four standard foundation engineering methods:
Concrete Pier Footings
The most established and universally accepted foundation style in municipal building codes.
- How it works: A power auger or two-person gas auger drills cylindrical holes 10 to 12 inches in diameter to a depth below your local frost line (typically 36 to 48 inches deep in cold climates). Steel schedule 40 pipe posts are set plumb into the holes, which are then filled with 3,000 PSI ready-mix concrete.
- Best for: Standard suburban soils, windy regions, and homeowners seeking guaranteed structural sign-off from building inspectors.
- Drawback: Labor-intensive; requires mixing dozens of heavy 60-pound bags of concrete or scheduling a cement truck.
Driven Pipe and Helical Ground Screws
A rapid, modern engineering approach that eliminates concrete pouring entirely.
- How it works: Heavy steel screws with broad spiral flights (like giant drywall anchors) are turned 4 to 6 feet into the soil using a hydraulic drive motor or compact mini-excavator attachment. The solar rack attaches directly to the exposed screw heads.
- Best for: Large residential arrays, sandy or clay soils, and off-grid remote properties where hauling wet concrete is impossible.
- Drawback: Requires specialized equipment or torque driver rentals; cannot penetrate solid bedrock or dense boulder fields.
Ballasted Ground Trays (Zero-Dig Solution)
The ultimate DIY-friendly breakthrough for homeowners who want to build a ground mount without digging a single hole.
- How it works: Heavy-duty, UV-stabilized recycled plastic or extruded aluminum tubs (such as the Powerfield PowerRack) sit directly on leveled ground. Each unit is loaded with 200 to 300 pounds of river stone, crushed gravel, or concrete blocks to hold the structure firmly against high winds.
- Best for: Rocky terrain, flat ground, rental properties, and fast weekend DIY installations.
- Drawback: Requires sourcing several tons of gravel or stone ballast delivered to your yard.
Top-of-Pole Mounts
A heavy central vertical steel mast supporting a pivoting racking cradle that holds 4 to 12 solar panels.
- How it works: A single thick steel pipe (typically 4-inch to 6-inch diameter Schedule 40/80 steel) is embedded in a deep concrete foundation. The array sits high up in the air, allowing cattle or wildlife to graze underneath.
- Best for: Snow-prone mountainous areas, uneven rocky ground, and dual-axis or manual tracking systems.
- Drawback: Requires heavy steel lifting equipment and deep, high-torque concrete foundations to withstand levered wind loads.
Why Ground Mounts Produce More Power (The Bifacial Advantage)
One of the greatest advantages of ground mounting over rooftop installation is the ability to leverage bifacial solar panels.
Standard monofacial solar panels have an opaque white or black backsheet. Light striking the rear face is completely wasted. In contrast, bifacial solar panels feature dual-tempered glass, allowing the rear side of the silicon cells to convert ambient reflected light into bonus electricity.
On a rooftop, panels sit just 4 to 6 inches above dark, heat-absorbing asphalt shingles; rear-side light capture is essentially zero. On a ground mount elevated 3 feet above a bed of white limestone gravel or winter snow, a 5kW bifacial array routinely behaves like a 6kW or 6.2kW array, delivering massive extra power during cold, short winter days when battery charging is most difficult.
Trenching, Conduit, and NEC Wire Sizing Basics
Because your ground mount sits away from your residence or battery enclosure, electrical conductors must travel underground safely.
The National Electrical Code (NEC Article 300.5) specifies minimum cover depths for underground electrical installations:
- Schedule 40 / Schedule 80 Rigid PVC Conduit: Minimum burial depth of 18 inches from grade level to the top of the conduit.
- Direct-Burial Underground Feeder (UF) Cable: Minimum burial depth of 24 inches.
- Intermediate Metal Conduit (IMC) or Rigid Metal Conduit (RMC): Minimum burial depth of 6 inches (useful if you encounter impenetrable rock near the surface).
Preventing Voltage Drop Over Long Distances
If your ground array is located 100 to 200 feet away from your home or shed, resistance in the wire will cause voltage to drop. If voltage drops by more than 2% to 3%, you lose substantial wattage in the form of wasted wire heat.
To minimize voltage drop:
- Wire Panels in High-Voltage Series: Modern hybrid inverters (e.g. EG4 18kPV, Sol-Ark 15K, or EcoFlow DELTA Pro Ultra) feature 450V to 500V MPPT charge controllers. Connecting 8 to 10 panels in series raises string voltage to 350V+ while keeping current low (around 10 to 13 Amps).
- Use 10 AWG or 8 AWG Pure Copper PV Wire: High voltage combined with thick copper conductors ensures total line losses remain under 1.5%, even over 150-foot trench runs.
Top Ground Mount Hardware and DIY Kits
If you are planning to assemble a ground mount array, these proven mounting kits and modular racks provide reliable wind resistance, quick assembly, and excellent longevity:
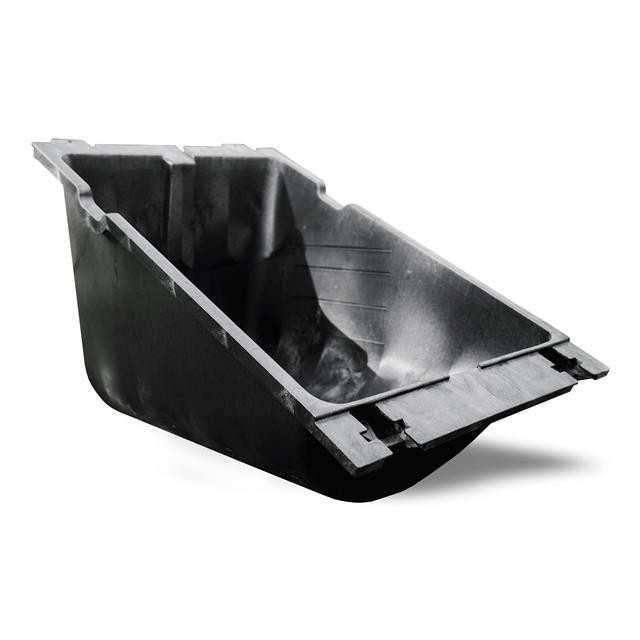
1. Powerfield PowerRack Ballasted Solar Mount
The gold standard for zero-excavation solar mounting. Molded from UV-resistant high-density polyethylene, each PowerRack holds a single 350W–550W solar panel at a fixed 25° angle. Simply set them on cleared ground, fill with 250 lbs of gravel ballast, and clip your panels down.
Check Powerfield Pricing on Signature Solar →
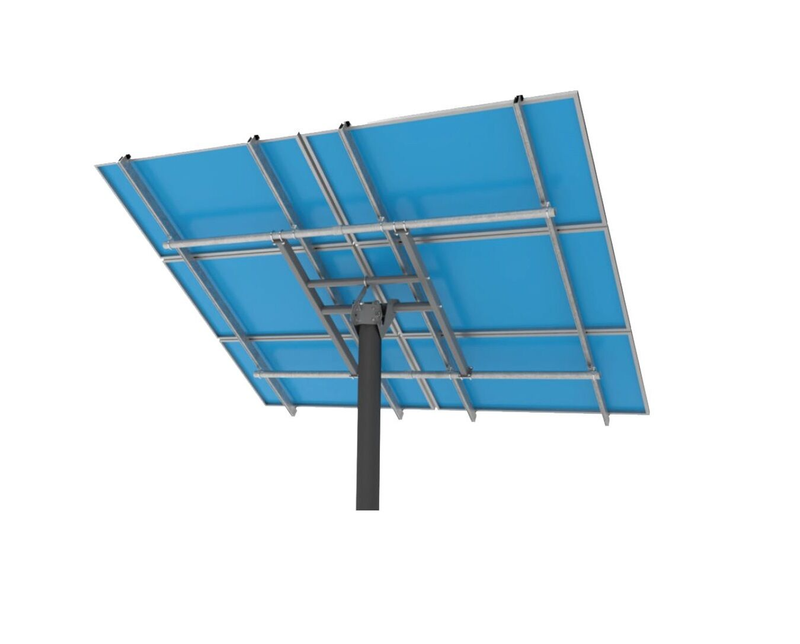
2. Tamarack Solar Top of Pole & Ground Mount
Manufactured in the USA from heavy-gauge structural aluminum and stainless steel hardware, Tamarack’s modular ground mount kits clamp directly onto standard 2-inch or 3-inch Schedule 40 steel pipes. Certified to withstand 130 mph winds and 50 PSF snow loads.
Explore Tamarack Mounts on ShopSolar →
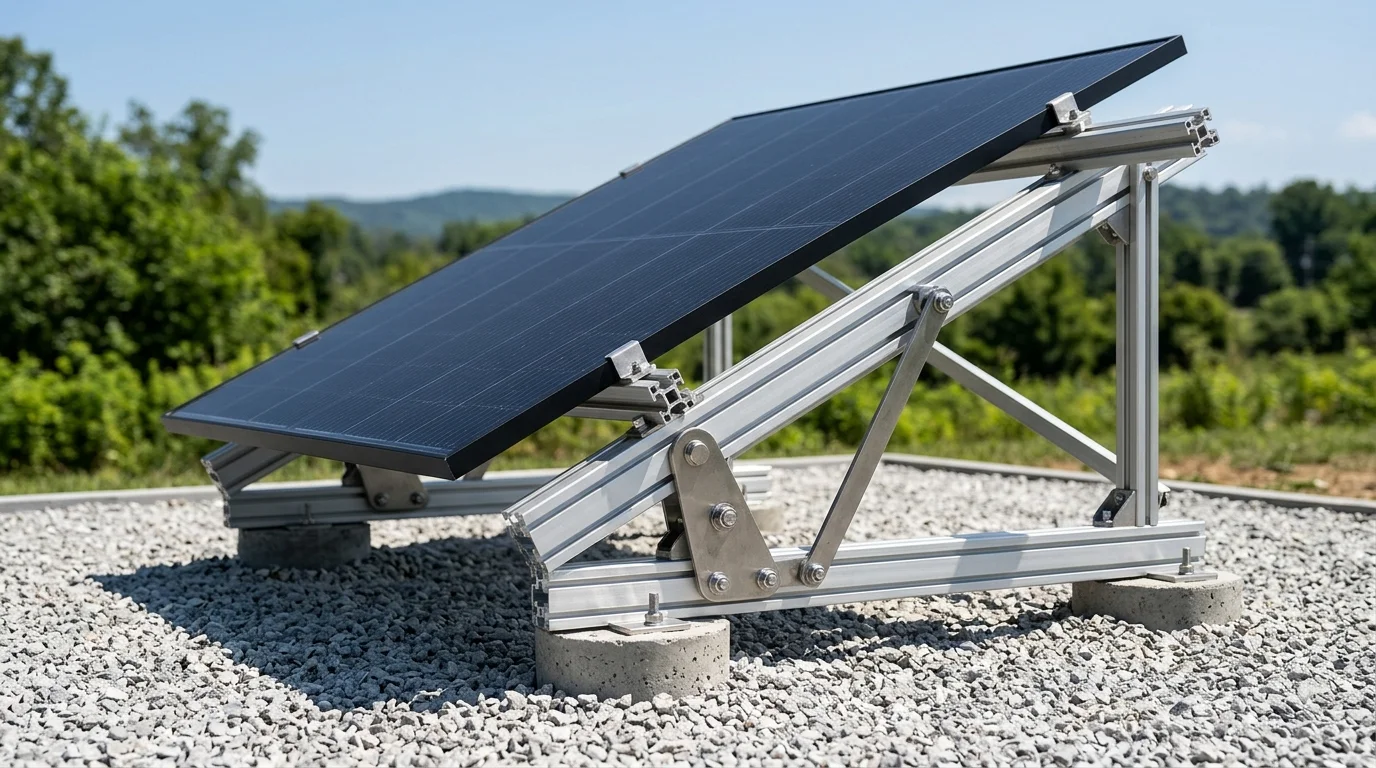
3. Maple Leaf Goose Mount Adjustable Racking System
Featuring tool-free telescoping rear legs, the Goose Mount allows one person to adjust array tilt from 15° to 60° in minutes. Ideal for off-grid cabins and battery systems where optimizing seasonal solar capture is vital to prevent generator runtime.
View Goose Mount on ShopSolar →
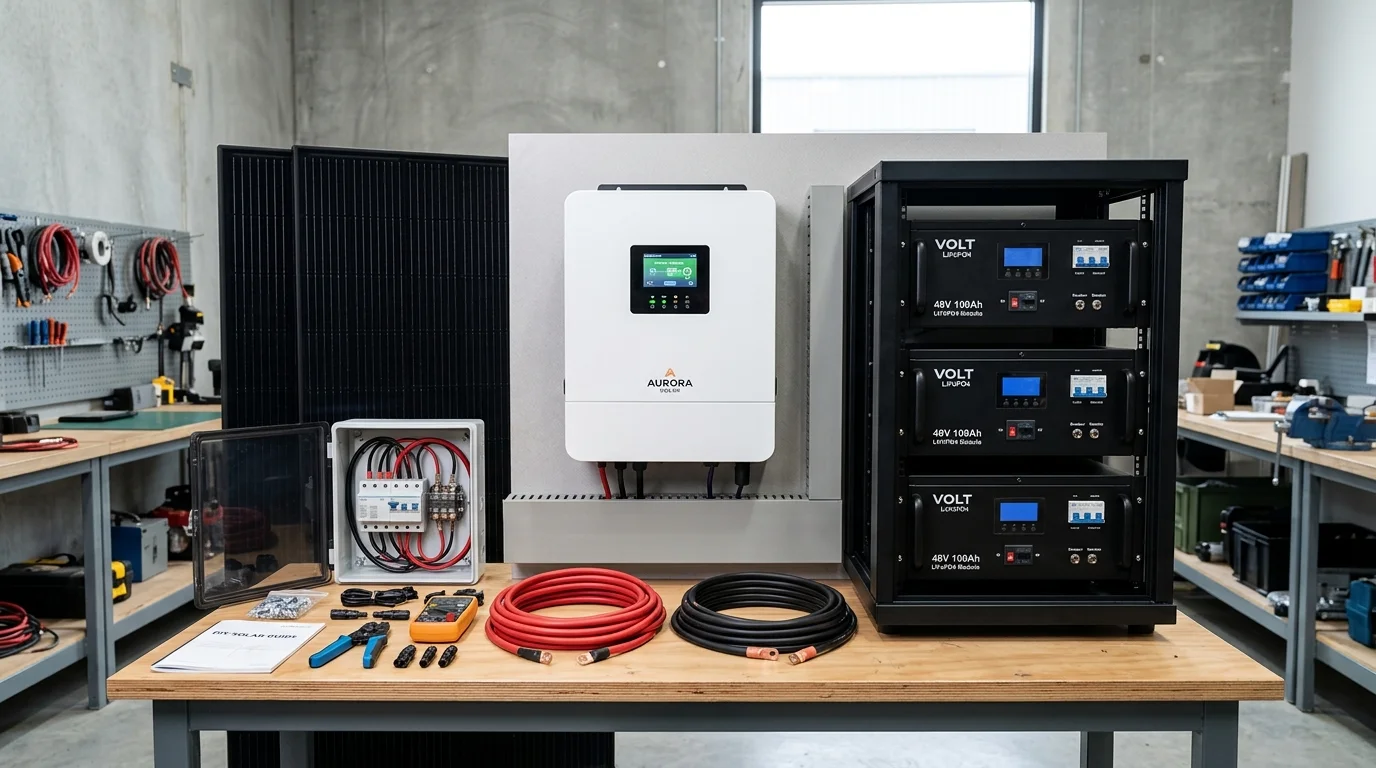
4. ShopSolar Complete DIY Ground Mount Package
Eliminate component guesswork. ShopSolar bundles Tier-1 bifacial panels, certified structural ground mounts, high-voltage split-phase hybrid inverters, 48V server rack batteries, and pre-wired combiner boxes on an insured freight pallet.
Explore Complete Ground Kits on ShopSolar →
Critical Ground Mount Mistakes to Avoid
- Mounting Too Close to the Ground (Snow Dams): Never set the bottom edge of your panels flush with the grass. Snow sliding down the array face will pile up at the base, creating a snow dam that covers the bottom row of cells and completely disables the string. Maintain at least 24 to 36 inches of ground clearance.
- Skipping Conduit Trench Marker Tape: When burying underground PVC conduit, backfill the trench halfway (about 9 inches below grade) and lay bright yellow or orange “CAUTION: BURIED ELECTRIC LINE BELOW” plastic warning tape before finishing backfilling. If anyone digs in your yard with a shovel or tractor in the future, the tape prevents lethal electrocution.
- Underestimating Wind Uplift: Solar panels are essentially giant aerodynamic sails. A 20-panel array presents over 400 square feet of surface area. In an 80 mph wind gust, that array generates thousands of pounds of upward suction force. Always build foundations strictly adhering to your local county wind engineering tables.
- Weed and Vegetation Neglect: Tall weeds, briars, and saplings will quickly grow up in front of a ground mount, casting hard linear shadows across bottom cells. Lay down heavy-duty commercial woven geotextile weed barrier fabric topped with 3 inches of clean crushed limestone gravel under and around your array.
Frequently Asked Questions (FAQ)
Is ground mount solar more expensive than roof mount?
Yes, ground mount solar typically costs 10% to 20% more upfront than a standard roof mount system of identical wattage. The cost difference comes from the additional structural steel/aluminum mounting racks, foundation concrete or ground screws, and underground conduit trenching. However, because ground arrays can be aligned to perfect True South and tilted for optimal yield, they produce 15% to 25% more electricity annually, which frequently pays back the difference within 4 to 6 years.
How much land or yard space do I need for a ground mount array?
A typical residential 8kW to 10kW solar array consists of approximately 20 to 24 large commercial panels (around 400W to 455W each). Such an array requires roughly 500 to 700 square feet of unobstructed ground space (e.g. an area roughly 40 feet wide by 15 feet deep). If installing multiple rows, add extra buffer space between rows to prevent the front row from casting shadows on the rear row.
Do ground mounted solar panels attract lawn mower damage or pests?
Lawn equipment and rodents are real considerations. Rocks flung by lawn mower blades can crack tempered solar glass, so maintaining a gravel or wood chip buffer strip around the array is strongly recommended. Additionally, mice and squirrels can chew wire insulation; protect all exposed wiring transitions between the racking rails and underground conduit entry with flexible metallic liquid-tight conduit or metal wire mesh guards.
Can I install a ground mount solar system myself?
Yes! In fact, many DIY solar builders find ground mounts significantly safer and easier to build than rooftop systems because there is zero danger of falling off a ladder or roof, and no need to penetrate roof decking or waterproof flashing. Utilizing zero-dig ballasted trays like the Powerfield PowerRack or modular clamped pipe kits allows a two-person DIY team to complete the physical installation over a single weekend.